Sound Prompter
Sound Prompter lets you generate sound effects (optionally with music) that match your composition. It generates .wav files in realtime (e.g. ~10s generation time for a 10s clip on a recent NVIDIA GPU). Click to play the example:
Prompt: “person cutting a fruit”
Prompt: “spaceship and laser beam”
Requirements
NVIDIA GPU (2xxx series or newer) with at least 10 to 12GB VRAM
~10GB free RAM when invoking the plugin
Workflow
Note: The unregistered version will contain some gaps and beeps in the output. Register your license to remove this.
Apply the effect to the layer you want to create the SFX for. Can be a subcomp or an adjustment layer to let multiple layers participate in the SFX creation.
Click “Add Text Input” to add a mask and link it in the “Positive Prompt” field. Then you can change the name of the mask to modify the prompt. Add another Text Input and link in “Negative Prompt” to supress certain keywords (e.g. music).
Click “Generate Audio”. On the first invocation this might take up to a minute to initialize as the AI model needs to be loaded and the video frames have to be rendered. Once this is done you can iterate on it with different prompts and settings much faster. As long as you only change prompts but not the duration / underlying layer or clips, no preprocessing needs to be done (much faster).
Once the computation is done the created audio file (.wav) is written to
<home>/Blace Plugins/Sound Prompter Generated Audioand added to your composition above the effect layer. In the unregistered plugin version the file will contain some gaps and beep sounds.
Premiere Pro
Text prompts are entered via the new prompt input dialog.
Generated audio files are not added automatically to the timeline, but have to be dragged manually from
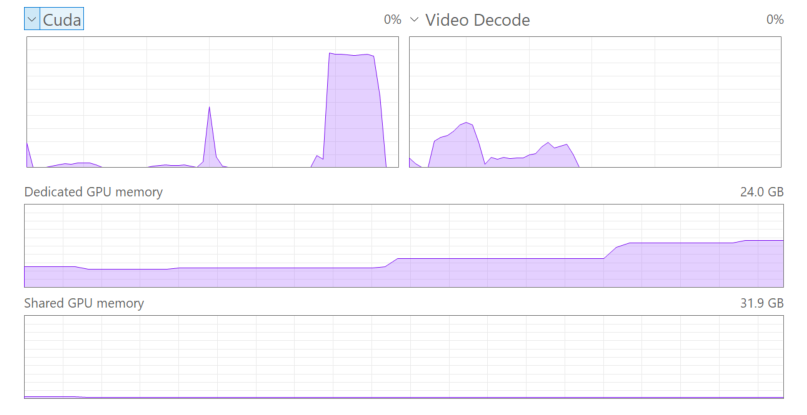
<home>/Blace Plugins/Sound Prompter Generated Audiointo the timeline. We recommend to add the output folder to Favorites in the Media Browser for quick access.There is no progress bar. In order to check progress, have a look at the task manager, specifically the “Cuda” tab. The first audio generation will take longer, as the clip has to be initialized / preprocessed (first small Cuda peak). Once this is done the main generation runs (long Cuda peak). If you then change the prompt but not the clip, only the generation part will run.
Parameters
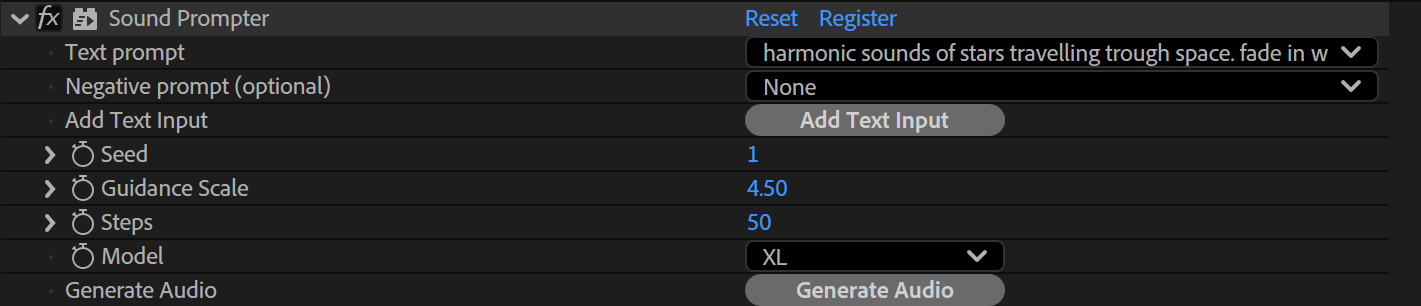
Text Prompt
Textual description of the SFX.
Negative Text Prompt
Supresses those keywords during generation. Can be used to avoid the generation of background music by including the term “music”. If the generated sound sounds harsh or otherwise shrill, add “shrill”.
Seed
Modify the Seed value to get different variations.
Prompt Influence
The higher this value the stronger the text and video guidance will influence the generated sounds.
Steps
The number of iterations the model runs. Lower numbers run faster but might produce worse results.
Model
Choose between XL and XXL model. The XXL model needs to be installed manually (from the component manager) and has higher runtime requirements.
Backend & Performance
Hardware Acceleration
Run calculations on the GPU. This will give massive speedups compared to CPU mode, especially on CUDA. On Windows with non-NVIDIA GPUs the speedup is still significant, but not all models are supported. Please check the product sites for notes about which models are supported.
Lower Precision
Compute with reduced precision if possible. This can save up to half of the memory and give you some speedups at the cost of sometimes slightly reduced quality.
Allow CPU Fallback
Run computation on the CPU if model cannot be executed on the GPU.
CUDA Memory Sharing (on CUDA machines only)
Try to keep frames data on the GPU for rendering. This is faster, especially on larger resolutions like 4k. Might not work on some NVIDIA driver versions (e.g. 476.x) so keep your drivers updated.
Model Offloading
Enabling this will make sure only the AI model parts which are needed for computation are kept on the GPU. This might lower VRAM usage under some settings at the cost of moving AI models in and out of GPU memory. Options are:
No offloading: Keep all models on the GPUs VRAM.
CPU: Move unneeded models to the RAM and back if needed. This will occupy RAM.
Full Unload: Completely unload models if not needed. This saves both VRAM and RAM but might be much slower, as the models have to be loaded again for every request.
Timeout
The maximum time a frame can be processed before the computation times out.
Samples (not available for all settings)
The number of ai samples to calculate. This will improve the models accuracy.
Parallel (only available if Samples > 2)
This will render all samples at the same time (faster), if disabled computation might be slower but require less VRAM.
Computation Tiles (not available for all settings)
Split the computation into several tiles. This can help if you run out of memory.
Stop Processing
Cancels a long-running frame computation immediately.
Restart
If a frame was canceled with “Stop Processing”, trigger a rerender.