Installation
Windows
Run the provided installer.
You will be asked for the target directory. The right folder should be set automatically. If this doesn’t happen, choose C:\\Program Files\\Adobe\\Common\\Plug-ins\\7.0\\MediaCore. Please don’t change the preset folders otherwise (a future installer will remove this option).
Options
GPU acceleration
Choose this if you have a NVDIA gpu to profit from GPU processing speedups. We recommend at least 8GB for most of our plugins, but the memory required will also depend on the individual settings.
Backup servers
Use this in case you experience connection errors with the default settings. Since our primary servers have better performance only change the setting if needed.
Uninstalling on Windows
Run the provided uninstaller or manually delete the folders C:\\Program Files\\Adobe\\Common\\Plug-ins\\7.0\\MediaCore\\<plugin_name> and C:\\Program Files\\Blace Plugins.
MacOS
Run the provided installer (preferably default, only use backup in case of connection errors). If you run into problems, please open a ticket and attach the logfile from ~/Library/blacetemp/blaceinstallerlog.txt
“Running package scripts”
If the installer seems to hang during this phase, please wait a bit longer. It has to download several GB of data which might take more time depending on your internet connection. You can use the Activity Monitor to see if there is network traffic (which means the installer is still working).
Uninstalling on MacOS
Delete the .plugin file from /Library/Application Support/Adobe/Common/Plug-ins/7.0/MediaCore. Additionally delete /Users/<username>/blacetemp if present as well as /Library/Application Support/Blace Plugins/<plugin-name>.
Components
The component manager is a new and flexible way to handle storing of many ai models. Often only the latest ai model is used but you may want to experiment with older models or install them for compatibility reasons. If you try to use an uninstalled model, the plugin will ask you to install the needed model files. To do this you
Locate the component in the Components tab.
Click the Download button, this will download all needed model files.
Click “Open models folder” to open the location of the plugins models.
Copy the .bin files from the downloaded .zip files to the model location.
(Optionally) Click “Refresh”. The component will switch its state to “Installed” and you can use it now.
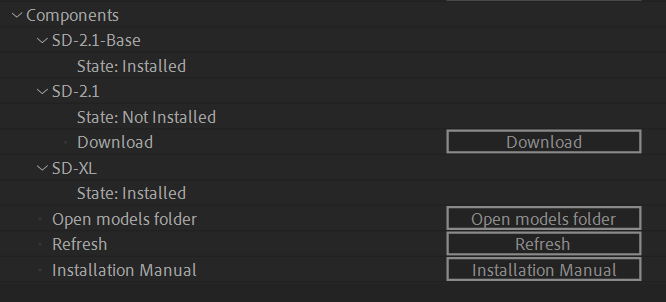
We will optimize this workflow in the future.
Hardware Support
Depending on your hardware and operating system the plugins can run with much faster hardware acceleration. On Silicon Macs with at least Sequoia installed you will always get hardware acceleration. The same for Windows with NVIDIA GPUs. If you have any other GPU on Windows, hardware acceleration will depend on wether a model is supported for this mode. Please check the descriptions of the individual plugins.
On non-NVIDIA machines plugins with Hardware Acceleration enabled might silently fall back to the slower CPU path. You can verify if a plugin is running on the GPU by toggling Hardware Acceleration on and disabling Allow CPU Fallback. If you see an error message, the model(s) could not be executed on the GPU.
hardware
cpu mode
hardware acceleration
Windows with NVIDIA GPU (at least 8GB VRAM)
✅
✅
Windows with non-NVIDIA GPU
✅
✅ *
MacOS ≥ Sequoia (Silicon, at least 32GB RAM)
✅
✅
Other MacOS
✅
❌
* Depends on model support. We are slowly rolling out more hardware-accelerated models for non-NVIDIA cards. Please reach out to us to request prioritization of specific models.